
I had too many pictures to share to keep adding them all to the original post.

I am just LOVING how this top is coming along.
When the girls and I first started this was supposed to be a utility quilt to take to the park.
It will still get to go to the park but first it is going on a bed.
I have a couple of border ideas in my head and need to jot them down before I forget what I am thinking!
Here the flowers are sewn on and I pinned on the butterflies to audition them, they passes with flying colors!
Here the flowers are sewn on and I pinned on the butterflies to audition them, they passes with flying colors!

These flowers were from a cutter quilt that I picked up for $5.00 at the thrift show. I guess the first person to cut on it thought they had used all the good parts-- wrong--I finished it off by cutting 'plates' to use to patch my sisters old quilt- you can see that story here.
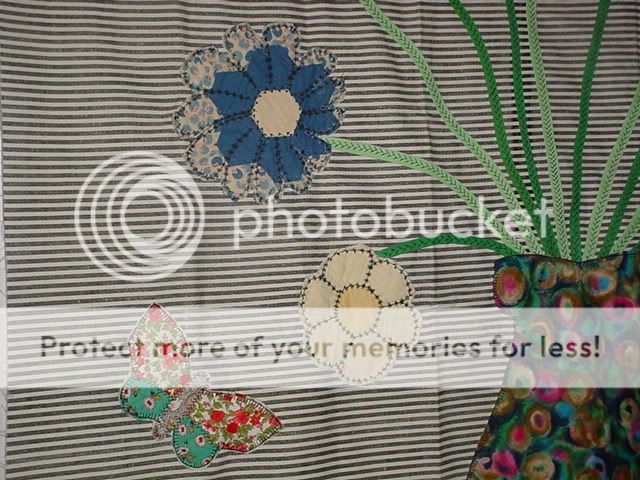
Here are a couple of close ups to show off how the applique is playing with each other.
I figured out that it was easier to embellish the flower before I sewed it to the top.
This is fun finding the flower from the 'plate' shape. These flowers are all ones that didn't make it into Theresa's quilt.
The background is a ticking material and has 'flaws' . Originally I was just going to sew the plates or "bubbles" on the background and make a Utility Quilt for the car. It was pinned to the mini- blinds so I could see the areas that needed covered up when the girls came over to play.

I told the kids that I was thinking of making the bubbles into flowers if I could figure out what to put them in.
A vase seemed to be the easiest to attempt.
 The flowers evolved on their own. You know how gals say their quilt talks to them. This one woke me up last night!
 I had one plate left to figure out (the light blue one on the right) I swear around 2 am I started dreaming of Tulips! How funny is that?
This morning when I got the grandson off to school, I snuck in a little sewing time and whipped out the tulip flower.

These were made from my stash of feed sack scraps.
I appliqued the butterfly to scraps of the cutter quilt and then cut the patch out and sewed it to the quilt top. Way easier then trying to applique directly to the background!

Thought I would share what I decided to do with the leaves. Seeing as the rest of the top has a little dimension to it, I decided the leaves need a pop too.
I am running out of scraps so I called good friend Linda and stole back the bag of scraps I gave her.
When I gift to friends, they know there are strings attached- pun intended-- I always get dibs if they haven't use it by the time I miss it.
Good thing Linda is slower at projects than I am b/c now I am getting enough to get my leaves 3D

I started doing the leaves in several fabrics until I ran out of quilt scraps to applique them too.
When I took the top to show off tonight after church, we decided to just use the green Swiss print for all the leaves.
It is on my list for tomorrow to get the bag of cutter scraps back from Linda and to make a bunch of green Swiss leaves.
I had given her the scraps after cutting for Theresa's quilt b/c I "would never need them". famous last words.
I will post part III when I get the leaves on and figure out the borders. I am giving myself a dead-line on this top b/c it was not on the list (not that I stick to lists). I have serveral other tops that are higher priority. (yeah right) This is just too much fun to put down!- good night