I received an email about the duffel Bags I make, I have posted the note and my response.
Disclaimer: I do NOT sell bags, I do NOT sell patterns, I sew and quilt for my personal enjoyment. I do however accept many, many donations from family and friends to keep my gifting spirit alive. Many of my projects are scrappy in nature because I am using up or re-using up materials I have been gifted over the years. If you are reading this post and find any value in the pattern instructions--please feel free to share with anyone you feel would make good use of this type of donation project. There is very little cost to make the bags. Durable fabrics, thread and time. If you have a sewing group in my area and would like for me to come demonstrate how to construct this project or any other that I do for groups, feel free to contact me by phone 417-366-0057- Thanks--cheryl
From: Jean Tanner
To: ozarkcastle@yahoo.com
Sent: Thursday, September 8, 2016 10:10 AM
Subject: duffel bag pattern
Cheryl,
I've been following your blog and am interested the the pattern you are
using for duffel bags to send you thing in to El Salvador. Our church
has sent 7 teams to Haiti and they take stuff there in suitcases and
then leave the suitcases there, which is causing a challenge for the
people in charge in Haiti. Do your teams bring the duffel bags back to
be refilled?
What pattern do you use?
I've been making quilts for Haiti w/o batting from a pattern from our
Methodist web site and made up my own pattern to use narrower strips.
Having fun and have had a lot of fabric donated.
Jean in Ia.
Forwarded Message -----
From: Cheryl Willis <ozarkcastle@yahoo.com>
To: Jean Tanner
Sent: Thursday, September 8, 2016 6:35 PM
Subject: Re: duffel bag pattern
We leave our bags there for the women to use. They are my design and made from donated fabrics. I researched the airline requirements and came up with my size. I haven't written out a real pattern but can explain- I might take photos of the next one and post directions.
Basically the sides are 15 1/2 inches each x 36 inches in length. This allows for seam allowance and turn over area for the draw string. My thought was we could use up misc fabrics as long as they measure 15 1/2- so far I have not had to piece many bags. I start with a 62 inch x 36 inch piece of strong fabric.
First I roll the hem for the top of the bag over about 1/4-1/2 inch depending on the fabric. Then roll it again about 3-4 inches and hem with a durable stitch (I prefer the chicken tracks stitch but an will do) I make my bags with draw strings that I pull through after the bag is complete--you could lay your drawstring down first, then sew the casing down--be careful not to catch the string. I make my strings a few inches larger then the bag opening and top sew the middle of the string to the middle of the bag so it can't be accidentally pulled through.
Then I fold the bag body in half right sides together and pin top, bottom, middle of seam (usually 3 or 4 pins is all needed) I then sew a chicken foot seam the length of the bag (top to bottom)- DO NOT sew through the drawstring area. This step is not necessary but- I like my bags square- they stack well and books and reams of paper can be shoved down the sides to get the weight up to the 50lbs allowed.
Then I fold the other two sides in half and sew a zig zag or chicken tracks stitch. If these stitches come out it doesn't matter - if you are using separate pieces on each side you could even serge them.
The bottom of the bag is a 15 1/2 square- This is the size ruler I had so everything is drafted around it--lol
I prefer to use two layers of fabric and stitch around all four sides about an inch in from the edge- I then do an X corner to corner. This is probably not necessary but for my piece of mind I do it. I can use up misc fabrics and make bottom up before hand.
Before I sew the bottom on I add a strap/handle. The guys have said the strap/handle really helps lift the bag- they throw these up on the top of buses to travel to villages.. I don't have a pattern for the strap/handle other then 4 to 6 inches x 28 to 30 inches. I double the fabric and sew down both long sides with a machine stitch- sometimes I will roll the edges in and sew closed- I rarely do the good sides together and sew and turn. But you can do it that way if you like.
Adding the bag to the bottom is not hard but I am not sure if I can explain with out photos- here goes--
Remember the sides we sewed on the bag body? Fold them together one at a time and mark with a pin the middle of the side. Then mark the middle of each side of the bottom. Start sewing with the bag good side facing down to the good side of the bottom (we will be sewing the bag then turning inside out) Start by matching up a pin from the body to a pin on the bottom- This first seam is half way to the first corner. Sew straight across the corner. Lift your foot and re-position the bag- kinda turn and re-fold. Sew across the entire new side- your pins should line up close- sew off the edge and repeat. Your last side stop a few inches before the end--sew the length of the last long seam together. Now finish the last couple of inches of the last bottom area, turn and finish the first half of the first side. (Way easier to do then explain--lol- )
Turn inside out and check for any oopsies--add the draw string, then stitch to secure it at the back middle-
Hope this helps. I only plan to make a dozen or so a year so I do the sewing myself. Starting next year I may do a class and have helpers do some of the sewing. No zippers, no real expense, takes me about 30 minutes to sew. I spent a couple of hours sorting and cutting pieces to make kits- now next time I need a bag, I can just sew i t up. And no two are exactly the same so I don't get bored--ha ha
Let me know if you need anything else- bless you for the work your hands are about to do
 |
| bottom is 15 1/2" sq. I use double fabric -straight stitch sew around all sides and through middle-- this is to make it sturdy. |
 |
| Many ways to make the drawstring- here I top sew two pieces together (reduces bulk) |
 |
| Then fold in half and fold in half again top stitch to secure. (You can make a tube and turn it inside out etc....- I am going for fast and secure) I have also used shoe strings, the edges of sheets and other sturdy materials. I use what is on hand. Do what works for you. |
 |
| This piece is the 'strap/handle' I straight stitch the edges together- then roll the tube so the seam is in the middle--do a zig-zag or sturdy stitch down the middle and optional straight stitch down both sides. When attached to the bag, the seam side faces in towards the bag. I use any materials that feel sturdy. This is a ticking material but you could use several layers of sheets, etc.... to make a 3 to 4 inch x 28 inch handle. |
 |
| After I turn/roll/sew the top of the bag. I like to prep the edges so the drawstring doesn't stick or rip the opening. To do this I fold the corner over about an inch and secure stitch it down at an angle (usually about 4 inch total. It is not necessary to sew the length of the bag for this step. You can also skip this step- I just like the look. |
 |
| Next the top is rolled down a couple of inches and secure stitched the length of the bag. Note: I pin at each end of the long top side, finger press and add a couple of more pins to keep me on track. There is no need to over pin b/c a little give and take won't matter. |
 |
| After the top casing is sewn for the drawstring the next step is to make the sides. I used 62 inch width of fabric b/c I could stay consistent with my sizes. I based this off my 15 1/2 sq that I use to cut the bottoms. If you want to skip this step--you would need to start with a 60 1/2 inch width. (you would end up with a round(ish) bag- with a sq. bottom.- What we are going for is sturdy for the weight and a size that will fly as checked luggage. This step is just sewing down the 3 sides (the forth gets sewn at the end) I fold the bag fabric in half good sides together and pin the top and bottom, finger press to get the line you want and pin a couple more pins- DO NOT sew through the casing for the drawstring!! Then repeat with the other two seams you need- fold the cut edge to the center sewn line and pin top and bottom, sturdy sew length of seam, etc..... |
 |
| Sew the strap/handle on--preferable before you sew the bottom to the sides Be careful NOT to sew through the casing area- I fold my handle over at the ends and secure stitch in place. I do not measure, I just start right below the top casing and end a couple of inches above the bottom of the bag. There are more photo examples. . |
 |
| I do not normally roll the bottom hem--this piece of fabric was once part of a bedspread and I didn't want to cut off the hem. This photo is to show that you need to mark the center of each side between the seams. |
 |
| The bottom of the bag is folded in half on each side and marked with a pin. This picture is off- set to show how the bag and bottom will (should) line up. On the start of this seam match up the center of one side of the bottom square with the center of one side of the bottom of the bag. Remove one pin and secure both pieces with the other pin. |
 |
| Sew starting in the middle and sew to the end of the bottom square Stop. Lift the presser foot and preposition the two fabrics to start the next side. I actually take the whole thing out and match up the next set of pins and then sew. |
 |
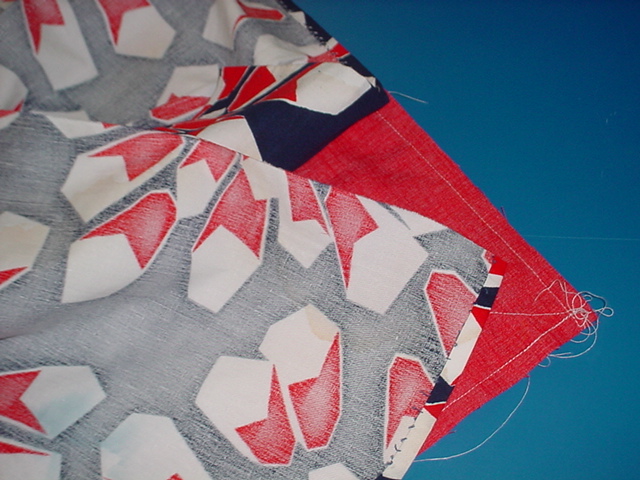
| This is what it looks like to sew off the edge- if you imagine the red bottom fabric is under the needle. This seam is actually going to cover the entire bottom- I use a secure stitch. |
 |
| When you get back around to the last side attaching the bottom to the bag, stop about half way on that seam and remove the bag. Double check to make sure you had attached the handle--if not do it NOW! Then sew the sides together, length of bag. Do a secure stitch. Now go back and finish sewing the last side and the first half of the first side. Bag is ready to turn inside out. |
 |
| I didn't notice until I saw the photo but the bottom needs an oopsie fixed. See how the secure stitching is higher then the original straight stitch? A bit off is ok but I would feel better about this corner if I reinforce it a bit to be safe. You can also see how sewing off each edge work out- I like this technique b/c it secure the edges from both directions. You do NOT clip the corners. Fast and easy! |
 |
| Congratulations! you are almost finished-- just a little bit more-- turn, add drawstring and fill this donation project up with 50 lbs of love. |
 |
| TA DA! inspect for oopsies, cut stray threads, remove forgotten pins etc.... |
 |
| Part of the inspection process, see how the corner is showing a bit of straight stitch- this is a clue that I need to reinforce that edge. On a happy note- how great is that corner! |
 |
| Several ways to add the drawstring. I usually use a safety pin to help pull the string through, today I couldn't find one so I used a bobby pin- I folded the string over about 6 inches and pushed the bobby pin around the fold. Worked perfect! |
 |
| Showing off the use of a bobby pin to pull the drawstring through the casing |
 |
| This is a different bag, I had to add a second fabric to get the width I wanted--I seriously use up anything I can. |
 |
| I am sure that as I get to the last of my large fabrics I will have to start piecing more to make the bags |
 |
| This seam is b/c the original fabric was more then 15 1/2 inches to narrow. It doesn't matter how many seams as long as the sides come out to 15 inches. |
 |
| Example of why I secure the opening for the drawstring |
 |
| Different bag--example of securing the handle--remember not to sew through the casing for the drawstring |
 |
| The bottom of handle is several inches above the bottom of the bag |
 |
When the bag is filled and the drawstring tightened the string will be very long. It is important to remember to secure sew the middle of the string to the middle of the back of the bag so it can't accidentally get pulled out.
The string is tied securely like you tie shoes. tie, bow, double tie the bow. You can also use zip ties for added security. |
 |
| Here are three different duffel bag "kits" I set fabrics aside that I can use and when I have time I kit them together for future use. |
 |
| This bag has a red bottom, red draw string and blue handle. See the print and the brown fabric? The two fabrics will be sewn together to form the bag. Evidently this "kit" was thrown together from the last of the large pieces I had out this day. |
 |
| Another "kit" ready to sew up. Blue print bag, Pink bottom Sq. Stripe fabric handle and blue sheet strips for drawstring. |
 |
| One more: Red Print bag, Rust fabric for the bottom, Green top to a sheet, will need sewn to secure the raw edge for this strap/handle. Strips of sheet to roll and sew for the drawstring. |
 |
| Found this note/tally sheet-- Evidently my goal was 25 sets of straps/handles--Looks like I set aside 40 before I quit counting. |
 |
| Reminder to secure stitch the drawstring to the middle of back side of the casing. |
 |
| drawstring should be a few inches longer then the top of the bag. I aim for about 66 inches give or take |
|
|
double knot tie like you do your shoes, this knot is not coming out until you want it too
|
Best Wishes and Bless your hands to good works. I would love to hear how you are using your bags.
contact me by e-mail ozarkcastle@yahoo.com --cw