Showing posts with label scrap quilt. Show all posts

Monday, October 26, 2015

The first two scrappy--boys

Evidently I neglected to post photos of the first two scrappy tops I made for the grand-boys.

All SIX (6) waiting to get quilted--seriously hoping the daughter's do this as a joint project--hint!

Ben's top--Lot's of fun prints!

Close up-  boots, baseball, basketball, horses, fish, sponge-bob-  busy top

This is the back to Ben's top--crazy

Andrew's quilt top- another good selection of scraps

Chiefs, horses, Garfield, bears, leopard prints, hot air balloons, whales etc...

Andrew's cont... hearts, Micky Mouse, frogs, Buzz

Gumby playing Soccer for Andrew's back

Tuesday, August 25, 2015

Connie's scrap quilts's


These were both made from scraps I re-gifted.  Connie took the time to iron and sub-cut enough for two huge keepsakes.
2 1/2 inch strips-  crazy fun!


lots of prints on this king size scrappy


Saturday, August 15, 2015

Scrappy Back for Christmas


scrappy Christmas panels thrown (sewn) together for a fun future back. 
one of my favorite pieces

Another ufo from the past
I think I was supposed to make a pillow from this piece--lol


fun children's print

Saturday, March 30, 2013

Two more Chisel tops

Another late night of sewing- lol  chisel circles is almost done, just need to decide if I want another border and if so, what.

 I had started to do a ribbon border but didn't think there was enough contrast.  So....I sewed the ribbons together and bordered them for a small couch size piece.
I am down to the bottom of my chisel pieces, I either need to get on a different kick or bust some stash.  Maybe tonight I can cut up some blues and make the chisel flowers.  Wonder if that will get it out of my system.  Wonder what die I am going to play with next!!  What would you do?

Friday, March 29, 2013

chisel circles die cut

Not a real tutorial but if you are like me and can get inspired by photos- here goes---(yes I know you get the same effect by adding triangles to the opp. corners of a sq)  I already had the chisels cut so I am working this shape-  you can use different fabrics for the two pieces.  Mix it up it all turns out great.

The stripes matching is purely accidental- just goes to show how accurate this die is!


 I am slowly getting to the bottom of my chisel bin.  Looks like I have just enough for a couple of more scrappy tops after this one :)
I pulled a handful of light colored triangles for my corners.
chain sew, make sure you have bobbin thread every once in awhile- lol

I had 80 sets pre-cut so this top will be sew 8 x 10 blocks

If case you are wondering why my machine is set on a place mat.  The answer is I am sewing on the dinning room table and I can just push the machine out of the way if I need the space.  This machine is a cheapie from Walmat and I have gotten a lot of mileage out of it.  Great stitch and good speed.  Scrap quilting doesn't need to be expensive.

Thursday, February 21, 2013

5 Minute quilt block-- link to tutorial

Dawn was looking for a new block to share with the quilt group next week.  She shared the link to Suzanne McNeil's 5- minute quilt block with me and asked what did I think.  I think she gets extra points for finding a block before I did--lol!
You can visit Suzanne's site and see the tutorial  --Here

I have a 'pile' of calico that has been begging to be worked.  I had gone as far as to pull it out a couple of times but it always seemed to get back on the shelf uncut.

Well thanks to today being a SNOW day...... the rest of the story is yet to be written.
I am a fan of cut first and figure out the setting later.

Here is my cut Yellows to be use in the center position as the triangle/geese.

While I was chunky cutting my 'three' fabrics per block  I made a pile to be sub-cut into 2 1/2 inch strips for a possible piano key border.  If the 'keys' don't make it into the top, I will use them on the back.  Hope is to bust this aging collection and get it all off the shelf.  I will piece as much as possible into the back and the rest is going out the door to anyone who will give it a good home.  More on that threat later- lol

This is a very die friendly block. ... Cut three rectangles-  You can actually do this with any size rectangle, I used my GO Die # 55005  (3 1/2 x  6 1/2) 

I choose to always use my dark (browns, blues) on the bottom and Yellows as centers and Red/Pinks as the other side.

The first couple I sewed I took time to iron.  After doing about a dozen, I unplugged the iron and finger pressed, way faster.  I am all about not going crazy making a utility quilt.  No one every complains that a wrinkle kept them up at night!

See how the bottom right looks a bit off?  It actually fixes itself when I roll the edge.  Promise!

See all better and even better after it gets sewn-  I use a chicken tracks stitch and white thread.

Sew... here we go, two rows done and sewn together.  Eight more to go for a 60 x 72 (ish) center.
This is going to be a controlled scrappy, being that I am just using the three piles of fabrics.  I divided  each row of 12 into sets of 4,6,8, 12 of color A,B,C.  So in the example, There are 8 red-a and 4 red-b matched with 4 blue,4 black,& 4 blue, The yellows are 4a, 4b and 4a.
The second row is 4 red, 8 pink,  4 black-a, 4 black-b, 4 blue,  2 yellow-a , 4 yellow-b, 6 yellow-a

I am hoping as I progress there will be secondary light and dark chunks emerge.  We will see.....

Thursday, January 3, 2013

Easy Street has been reveled, I had to sew a few blocks!

Thanks Bonnie for another fun Mystery. Link to the Link up will be up on Monday.

I can't wait to see what the other hundreds of  participants have come up with for their future keepsake heirloom masterpieces!

The original was to be  apple green, turquoise, grey(accent/constant) and purples on a white w/black background.  I flipped a coin and decided on Red for my background.  Kept the Greens and Purples and sub-ed in Yellow for the blues.  I chose my 'accent' color by pulling a chunk of black w/pink roses off the shelf.  It was the first piece that had enough yardage.


The original is a scrappy quilter's dream, throw it all in there.  I however chose to be more controlled.  I used my GO and dies to cut everything.  I went for speed over variety.  I tend to cut in sets of 4 or 8.  This worked well for me.  The top will have a pieced block look with out the headache of  not having matching fabric 'touch'.

I wish I could say I put a lot of thought into this top but truth is, it is what it is.  If the instructions called for X amount of sqs and I could get it out of one fabric, I did.  All my center purple sqs are the same, for example.  I rather like that my outer green triangles are all the same.  I will pick my fabrics for the final outer border by what will work from the pieces I have left over.  Leaning towards 2 inches of red and 6 1/2 of a yellow print not in the top.

My regret is that I didn't stay caught up each week so I had a lot of sewing to do.  I did however have everything cut out and dealt into sets to work on if/when I get a good snow day.


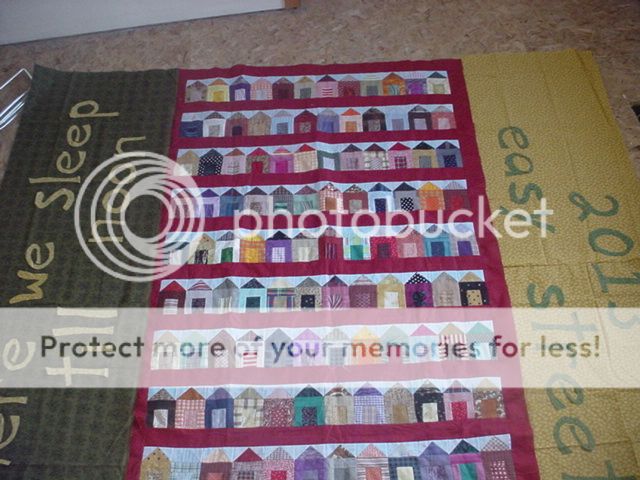
I think I am figuring out what I want to do for my back.  This long pieced houses is an E-Bay purchase.  It is pretty close to the length of my Red Hot Easy Street top.  The dark green yardage has been in my stash for way to long. (I am sure if I use it on a back I will have a dozen other projects it would have been perfect for!!)  The Yellow on the right is also used in my top. 
My 'back' is finished, the link to that post is HERE
Do you think this would be a good applique?  I am leaning towards 2013 Easy Street (like it is an address)
The dark green side will say:  "Where we sleep till Noon"
now don't hold your breath while I get that part done- lol

check out Easy Street on Bonnie Hunter's website www.Quiltville.com

Saturday, April 14, 2012

Cut First Ask Questions Later

All of us have different reasons for getting our GO's or BABYs. Mine was to Kit
scrappy stash for future TO DO's

I have really enjoyed seeing the eye candy on the Accucutquilters yahoo  group. Especially now that
the photos are grouped by dies. I don't know about you but I have added more then a couple of dies to my pile after seeing a great picture-lol

In the old days of rottery cutting I would have to think about what I was wanting to 'cut'. Now that I have my 'dies' I can cut first and figure out what the top will be later.

I just posted a Large Tumbler that was made for an up coming wedding. I was originally going to cut out issoc triangles to kit up for our church group to sew and return. When I saw a tumbler posted in the new photos I thought that looked like something our group could sew and have fun with.

Several gals brought large scraps and we cut what would work. I didn't have a number in mind or a plan for how it was going to look. I just knew if I dealt the pieces out we could make something with them. There were 104 red/blue/green tumblers total. Most fabrics has 4-8 pieces cut. A 8 x 13 random setting would
yield a small top that we could border and have done quickly. (if this number had been off I could have cut a few pieces to fit in or left a few out)

My niece was over visiting while I was making up the rows to sew and suggested a light background block to separate the darks. She found a bolt of yellow w/Red/Blue and Green flowers that just pulled everything together.

I am not insane enough to just start cutting on all my fabric,...BUT when I do pull materials for a Have To DO, I then sort my scraps into strings or crumbs OR what I call 'cut into later' by color. Then if I am in the mood to do a scrappy I can pull the basket of color and die cut the size I need and add those left overs to the strings or crumbs pile.

I have seen several discussion about fabric waste with the dies, for me it is the opposite, I am finally using the odd shapes that normally would have been saved for applique (there is no way I am going to sit around and die cutting 2" sqs or triangles etc..by hand.)

I have also seen people ask about straight of grain and true size of the squares. I cut what ever I can with what I have (yes even on bias) If a material stretches during the cut, it will also stretch during the sewing. I
sew by sight not counting on pins to fix it for me. I have not had any trouble with dies. I don't starch, rarely pin or iron and have made many many quilts this past year that would not have had a chance of getting done if I had to cut them out by hand.

Wow, I am long winded this evening- lol I just wanted to jot down my reason for my remark- cut first ask questions later, with the dies you really can cut and figure out the rest when you get to it. I have been asked "How big is this going to be" my answer usually is "I don't know yet, I'm not done" A small top can grow up with a couple of borders. A large top can get divided into several smaller tops, it is never done till it is done-

So now I want to hear how you plan your scrappy quilts, do you pick a pile and dig in or is there a plan?

Monday, November 21, 2011

Another MUST DO from the QuiltMaker 100 Blocks Vol 4

QuiltMaker 100 Blocks Vol 4
Page 31 Block by Jan Krentz Designs- :  Star-ring Buttons

I chose to make my Test Block with a Black background and the ring and star points in scraps.  I love this block even though it is best done w/paper piecing.

Happy to say I have 36 block sets cut out and ready to get sewn up.
To keep the quilt really scrappy, I am adding a setting border between blocks.


This is what I did yesterday.... Took a photo that is- lol

A friend bought this from an antique shop as a Christmas Gift for her mom.
What a beautiful Trip Around the World setting~
I had to get a couple of photos and add on to my TO DO list.  The quilter used 1 inch pieces and hand quilted this beautiful keepsake.

My version will most likely be from 1 1/2" stripes.  Now I have a goal to use up my solids!  I can always use another scrap quilt for our bed! 
2012 is looking to be a year of busting stash- wish me well-  cw

Tuesday, October 18, 2011

Crumb Along is coming along-

I set the blocks 8 X 8 and added a 1 1/2" inner border of navy blue Swiss (mini polka dots)  Now to flip a coin to see if I do a piano key border or more crumbs.  I can't decided on 'words' so this one may not get any.

Good news is my 'crumb' pile is growing and I am adding to it almost daily.
One of my goals this years was to sort the stash and get my crumbs and strings under control-  yeah right!!