
I have made several T-shirt quilts over the years. I have tried several different techniques.
When Brian (a co-worker) asked if I could do anything with a pile of his favorite sports shirts, I felt compelled to say: "Sure"
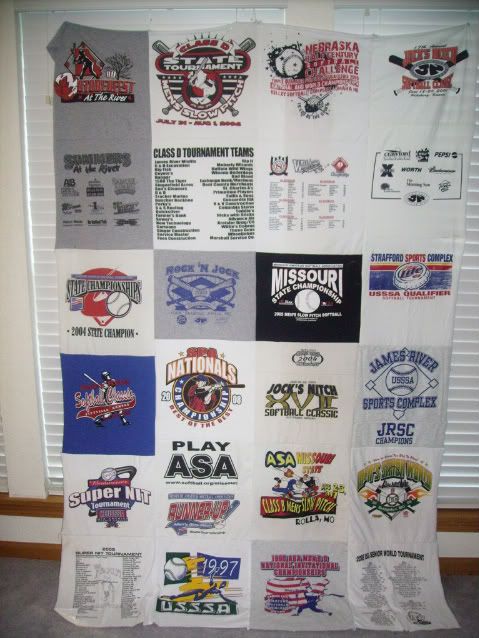
Brian gave me free artistic control on layout and size.
Men make the best clients, they just want it done, don't talk about the details.
He likes RED so I think this one will get that color sheet on the back and quilted in a Herringbone pattern. (I don't do the meandering)
Top is 60 x 87 (ish) a nice twin size, throw it over the couch in the Man Cave!
Hope he enjoys it for a long time. --cw
Quick How to DO--
I know there are a lot of tutorial 'out there' on how to make a T-Shirt Quilt- well here's one more.
This way does not involve ironing! The key for me is to use 5 pins per piece (no more, no less). I do not use sizing, or stabilizer. (I rarely use pins when sewing so this is a big aaaaaahh haaaaa moment for me) The knits of the t-shirt have a mind of there own.
I pin each end, the middle and the middle of the middle and was able to control the blocks. I cut 15" blocks from the fronts (and back if there was a schedule) I had several shirts that had smaller images that I cut 12 1/2 x 15. (I used one per row of these shorties.)
A few of the shirts had info on the front and back that could be sewn together and made into a 15 x 15 block. (On those I didn't worry about an exact measurement, I just re-sized after sewing the two pieces together.)
On past projects I have not had the luxury of having all the shirts a similar size to start with. I have added borders to the smaller images and achieved a 'floating' look for the top. I found that the knit and cottons didn't play well together and made the top feel stiff (IMHO). They always turned out great and were well loved BUT I did NOT get to enjoy the process.
This one was fast and easy and 'feels' good. I saved the left over backs and larger areas to use as borders the next time I am asked to make a memory quilt from someones T-shirts.
Making the blocks the same size to start with saved so much time in the construction. Using pins (I know you thought I couldn't do it) saved me so much $$ not purchasing stabilizer.
Hope this helps you get motivated to sew your own keepsake quilt.- be good cw


 Blizzard of 2011-
 I have made several T-shirt quilts over the years. I have tried several different techniques.